Defeat Hp Continuous Ink Error Message
Z7_3054ICK0KGTE30AQO5O3KA30N0
hp-concentra-wrapper-portlet
![]() Actions
Actions
HP OfficeJet Printers - Resolving 'Print System Problem', 'Problem with Ink System' Errors
This document is for HP OfficeJet 251dw, 276dw, 3610, 3620, 6100, 6600, 6700, 7110, 7510, 7610, 7612, 8100, 8600, 8610, 8615, 8616, 8620, 8625, 8630, 8640, 8660 9010, 9012, 9013, 9014, 9015, 9016, 9018, 9019, 9020, 9022, 9023, 9025, 9026, 9028, and 9012 printers.
The printer does not print, and one of the following error messages displays on the computer or printer control panel.
-
Print System Problem
-
Problem with Ink System
-
Problem with Printer System
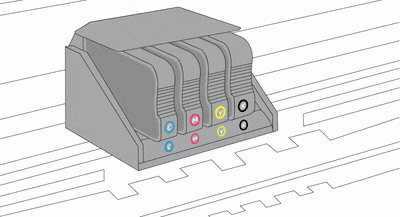
Step 1: Check the ink cartridges for leaks
Replace any ink cartridges that leak.
caution:Do not use leaking ink cartridges.
To find your cartridge number and to purchase ink or toner supplies, go to HP Store or a local retailer. Make sure you are using the correct genuine HP ink or toner supplies for your printer. HP cannot guarantee the quality or reliability of non-HP cartridges or refilled HP cartridges. To check the authenticity of your cartridges, go to the HP anti-counterfeit webpage (in English).
If you have a defective cartridge or printhead, it might be under warranty. To check the warranty on your ink or toner supplies, go to Printer and Page Yield Overview, and then review the limited warranty information for your supplies.
-
Open the door to access to the ink cartridges.
-
Wait until the carriage stops moving before you continue.
-
Remove an ink cartridge, and then inspect the ink cartridge for leaking ink.
-
If the ink cartridge leaks, replace the ink cartridge. If the ink cartridge is not leaking, insert the ink cartridge into its slot.

-
Repeat these steps for the other three ink cartridges.
-
Close the ink cartridge access door.
If the error message persists, continue to the next step.
Step 2: Reset the printer
Resetting the printer might clear the error message.
-
With the printer turned on, disconnect the power cord from the printer.
-
Unplug the power cord from the power source.
-
Wait 60 seconds.
-
Reconnect the power cord to a wall outlet and to the printer.
note:
HP recommends plugging the printer directly into a wall outlet.
If the error message persists, continue to the next step.
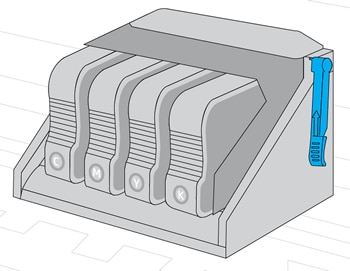
Step 3: Check the carriage for a printhead latch
Open the door to access to the ink cartridges, and then determine if the carriage inside the printer has a printhead latch.
Example of a carriage with a latch
-
If your carriage has a printhead latch, continue to the next step.
-
If your carriage does not have a printhead latch, skip to Service the printer.
Step 4: Reseat the printhead up to three times
To clear the error message, you might need to reseat the printhead up to three times.
-
Open the door to access to the ink cartridges.
-
Wait until the carriage stops moving before you continue.
-
Unplug the power cord from the rear of the printer.
warning:
You must disconnect the power cord before reaching inside the printer.
-
Lift the carriage latch, slightly lift the printhead, lower the printhead back into the carriage, wiggle the printhead left and right, and then lower the carriage latch to lock the printhead into place.

-
Close the ink cartridge access door.
-
Reconnect the power cord to the rear of the printer, and then check the control panel for the error message.
-
Sometimes error messages persist after inserting the printhead. If the error message persists, repeat the steps to reseat the printhead up to three times.
If the error message persists, continue to the next step.
Step 5: Replace the printhead
If the previous troubleshooting steps did not resolve the issue, order a new printhead for replacement.
If you have a defective cartridge or printhead, it might be under warranty. To check the warranty on your ink or toner supplies, go to Printer and Page Yield Overview, and then review the limited warranty information for your supplies.
If your printhead assembly is no longer under warranty, you might be able to purchase a new one online.
-
If you are in Asia Pacific, the site directs you to a service center in your area.
-
Search HP Parts Store for your printhead part number. Refer to the following table to find your printhead part number based on the ink cartridge numbers your printer uses.
Ink cartridge Number
Country/Region
Printhead Part Number
HP 950, 951
Americas
CR322A
Europe, Middle East, Africa
CR324A
Asia Pacific, Japan
CR326A
HP 952-959
Worldwide
M0H91A
HP 962-969
Worldwide
3JB16A
-
Follow the online instructions to order the printhead assembly.
If the error message persists, continue to the next step.
Step 6: Service the printer
Service or replace your HP product if the issue persists after completing all the preceding steps.
Go to Contact HP Customer Support to schedule a product repair or replacement. If you are in Asia Pacific, you will be directed to a local service center in your area.
To confirm your warranty status, go to HP Product Warranty Check. Repair fees might apply for out-of-warranty products.
lawrencehazies2002.blogspot.com
Source: https://support.hp.com/us-en/document/c06435019
0 Response to "Defeat Hp Continuous Ink Error Message"
Postar um comentário